Step-by-Step Guide to Building a FullStack LangChain4j Application
Without organization-specific context, a Large Language Model (LLM) functions merely as a general-purpose tool. This is where LangChain comes into play. LangChain enables developers to enhance and customize LLMs by integrating them with a company’s unique data and APIs, transforming these models into valuable, tailored assets.
In this tutorial we will build a full stack LangChain application using LangChain4J, SpringBoot and ReactJS. We will follow these steps
- Base Project Setup
- LangChain4J Dependencies
- Setting Up LangChain4J Agent and Tools
- Wiring Up the Application
- Web Interface
- Functionality to Upload Your Own Documents
- Verify Application
- Conclusion
Completed application code is available in github repositories below:
1. Base Project Setup
Using Spring Initializr, generate a project with following dependencies:

Ensure that Docker Desktop is running. This is necessary for the developer tools to start a PostgreSQL container in the local development environment.
To facilitate our chat interface, we will open a REST endpoint. Let’s create a skeleton for the controller endpoint that simply takes a user’s question as a query parameter:
import org.springframework.web.bind.annotation.GetMapping;
import org.springframework.web.bind.annotation.RequestParam;
import org.springframework.web.bind.annotation.RestController;

@RestController
public class ChatController {

    @GetMapping("/chat")
    public String getResponse(@RequestParam String question) {
        // Placeholder response logic
        return "Received question: " + question;
    }
}
This basic controller sets up an endpoint at /chat that accepts a question query parameter. For now, it simply echoes back the received question. We will expand on this functionality as we integrate LangChain and build out our application.
2. LangChain4J Dependencies
a. Obtain and Store the OpenAI API Key
- Obtain an API Key: Sign up for an API key from OpenAI if you haven’t already.
- Store the API Key: Set the API key as an environment variable. Add the following line to your shell profile (e.g.,
.bashrc,.zshrc, etc.):
export AI_OPENAI_API_KEY="your-openai-api-key"3. Reload your profile: to apply the changes:
source ~/.bashrc # or ~/.zshrc, depending on your shell b. Add Dependencies to the Project
- Update Project Properties: Open your
pom.xmlfile and update the properties section to specify the Java version and LangChain version:
 <properties>
  <java.version>22</java.version>
  <langchain.version>0.30.0</langchain.version>
 </properties>
2. Add LangChain4J Dependencies: Add the following dependencies to your pom.xml file within the <dependencies> section:
 <dependency>
   <groupId>dev.langchain4j</groupId>
   <artifactId>langchain4j-open-ai-spring-boot-starter</artifactId>
   <version>${langchain.version}</version>
  </dependency>

  <dependency>
   <groupId>dev.langchain4j</groupId>
   <artifactId>langchain4j</artifactId>
   <version>${langchain.version}</version>
  </dependency>

  <dependency>
   <groupId>dev.langchain4j</groupId>
   <artifactId>langchain4j-open-ai</artifactId>
   <version>${langchain.version}</version>
  </dependency>

  <dependency>
   <groupId>dev.langchain4j</groupId>
   <artifactId>langchain4j-embeddings-all-minilm-l6-v2</artifactId>
   <version>${langchain.version}</version>
  </dependency>

  <dependency>
   <groupId>dev.langchain4j</groupId>
   <artifactId>langchain4j-document-parser-apache-pdfbox</artifactId>
   <version>${langchain.version}</version>
  </dependency>

  <dependency>
   <groupId>dev.langchain4j</groupId>
   <artifactId>langchain4j-document-parser-apache-poi</artifactId>
   <version>${langchain.version}</version>
  </dependency>
3. Setting Up LangChain4J Agent And Tools
Defining the Agent
LangChain4J allows us to define an agent using an interface that processes a string input and returns a string output.
The SystemMessage annotation sets the context for the agent.
Our agent will need Tools to interact with our backend system to retrieve for example customer details.
Integrating Tools with the Agent
Our agent will require tools to interact with our backend system to retrieve customer details and other information.
Backend Service Definition
First, let’s define our backend system, which uses an in-memory collection of users.
Tools Using Our Service
LangChain4J provides a construct to expose certain functionalities as tools via the Tools annotation. Here, we have set up tools that use our backend service to perform operations such as finding customers and updating their details.
By using the @Tool annotation, we expose the methods of our CustomerService class as tools that can be utilized by our agent. This allows the agent to interact with the backend service to retrieve and update customer details, ensuring seamless integration between the agent and the backend system.
4. Wiring Up Application
LangChain4J provides a builder pattern to create an AIService. This service allows you to specify the chat model (e.g., OpenAI), define memory to retain past messages, set up an embedding model and store, and configure tools to run custom logic. We have integrated these components using Spring configuration, as shown below:
@Configuration
public class Config {
    @Bean
    CustomerServiceAgent customerSupportAgent(StreamingChatLanguageModel streamingChatLanguageModel,
                                              ChatLanguageModel chatLanguageModel,
                                              ContentRetriever contentRetriever,
                                              CustomerServiceTools customerService) {
        return AiServices.builder(CustomerServiceAgent.class)
                .chatLanguageModel(chatLanguageModel)
                .streamingChatLanguageModel(streamingChatLanguageModel)
                .chatMemory(MessageWindowChatMemory.withMaxMessages(20))
                .tools(customerService)
                .contentRetriever(contentRetriever)
                .build();
    }

    @Bean
    CustomerServiceTools customerServiceTools() {
        return new CustomerServiceTools(new CustomerService());
    }

    @Bean
    StreamingChatLanguageModel streamingModel() {
        String key = System.getenv("AI_OPENAI_API_KEY");
        return OpenAiStreamingChatModel.withApiKey(key);
    }

    @Bean
    ChatLanguageModel chatLanguageModel() {
        String key = System.getenv("AI_OPENAI_API_KEY");
        return OpenAiChatModel.withApiKey(key);
    }

    @Bean
    ContentRetriever contentRetriever(EmbeddingStore<TextSegment> embeddingStore, EmbeddingModel embeddingModel) {
        int maxResults = 1;
        double minScore = 0.6;

        return EmbeddingStoreContentRetriever.builder()
                .embeddingStore(embeddingStore)
                .embeddingModel(embeddingModel)
                .maxResults(maxResults)
                .minScore(minScore)
                .build();
    }

    @Bean
    EmbeddingModel embeddingModel() {
        return new AllMiniLmL6V2EmbeddingModel();
    }

    @Bean
    EmbeddingStore<TextSegment> embeddingStore(EmbeddingModel embeddingModel, ResourceLoader resourceLoader) throws IOException {

        EmbeddingStore<TextSegment> embeddingStore = new InMemoryEmbeddingStore<>();

        return embeddingStore;
    }

    @Bean
    FileSystemResourceLoader resourceLoader() {
        return new FileSystemResourceLoader();
    }

}
Integrating the CustomerServiceAgent into the Controller
Now we can wire up the CustomerServiceAgent into the controller:
@RestController()
@CrossOrigin(origins = "*")
public class ChatController {
    private CustomerServiceAgent agent;

    public ChatController(CustomerServiceAgent agent) {
        this.agent = agent;
    }
    @GetMapping("/chat")
    public String chat(@RequestParam("question") String question) {
        return agent.chat(question);
    }
}
Starting the Application
To start the application: ./mvnw spring-boot:run . Now a request to list current users uses the tools we implemented to query our custom datastore.
GET http://localhost:8080/chat?question=Please list the current users

HTTP/1.1 200 OK
Vary: Origin
Vary: Access-Control-Request-Method
Vary: Access-Control-Request-Headers
Content-Type: text/plain;charset=UTF-8
Content-Length: 1028

Here are the current users with rebate applications:

| Correlation ID | Email           | First Name | Last Name | Address                          | Rebate Type  | Amount | Status          |
|----------------|-----------------|------------|-----------|----------------------------------|--------------|--------|-----------------|
| 18666A         | curtis@gmail.com | Brock      | Curtis    | 76 Chalmers Ave, Redfern 2119   | FLOODS       | 1000   | SUBMITTED       |
| 19966A         | curtis@gmail.com | Brock      | Curtis    | 76 Chalmers Ave, Redfern 2119   | BUSH_FIRE    | 550    | SUBMITTED       |
| 21966A         | curtis@gmail.com | Brock      | Curtis    | 76 Chalmers Ave, Redfern 2119   | HAIL_DAMAGE  | 250    | SUBMITTED       |
| 36559B         | blogg@gmail.com  | Joe        | Blogg     | 40 Bridge Road, Sydney, 2000    | BUSH_FIRE    | 300    | APPROVED        |
| 91137D         | duran@gmail.com  | Leandro    | Duran     | 199 George Street, Newtown, 2000| HAIL_DAMAGE  | 300    | PAYMENT_SUBMITTED |

Response code: 200 (OK); Time: 6186ms (6 s 186 ms); Content length: 1028 bytes (1.03 kB)
5. Web Interface
Create a brand new react app using create-next-app , use TypeScript , Tailwind CSS and App Router .
npx create-next-app@latest
Need to install the following packages:
create-next-app@14.2.3
Ok to proceed? (y) y
✔ What is your project named? … chat-app
✔ Would you like to use TypeScript? … No / Yes
✔ Would you like to use ESLint? … No / Yes
✔ Would you like to use Tailwind CSS? … No / Yes
✔ Would you like to use `src/` directory? … No / Yes
✔ Would you like to use App Router? (recommended) … No / Yes
✔ Would you like to customize the default import alias (@/*)? … No / Yes
Navigate into the app directory and start the development server:
cd App
npm run dev
Next update contents of page.tsx in the root folder:
"use client"
import { useState } from "react"

export default function Chat() {
    const [message, setMessage] = useState<string>("");
    const [response, setResponse] = useState<string>("");

    const handleSubmit = async (e) => {
        e.preventDefault();
        setResponse((r) => {
          return "Please wait retrieving response ..."
        })
        const response = await fetch(`http://localhost:8080/chat?question=${message}`);
        const content = await response.text();
        setResponse(content);
        console.log(content);
    }

    const handleInputChange = (e) => {
        setMessage(e.target.value);
     }


    return (
        <main className="flex h-screen flex-col items-center justify-center">
            <section className='chatbot-section flex flex-col origin:w-[800px] w-full origin:h-[735px] h-full rounded-md p-2 md:p-6'>
                <div className='chatbot-header pb-6'>
                    <div className='flex justify-between'>
                       A simple RAG application using LangChain4J in the backend
                    </div>
                </div>
                <div className='flex-1 relative overflow-y-auto my-4 md:my-6'>
                    <textarea readOnly value={response} rows={50} cols={500}>
                    </textarea>
                </div>
                <form className='flex h-[40px] gap-2' onSubmit={handleSubmit}>
                    <input onChange={handleInputChange} name='input' value={message} className='chatbot-input flex-1 text-sm md:text-base outline-none bg-transparent rounded-md p-2' placeholder='Send a message...' />
                    <button type="submit" className='chatbot-send-button flex rounded-md items-center justify-center px-2.5 origin:px-3'>
                        <svg width="20" height="20" viewBox="0 0 20 20">
                            <path d="M2.925 5.025L9.18333 7.70833L2.91667 6.875L2.925 5.025ZM9.175 12.2917L2.91667 14.975V13.125L9.175 12.2917ZM1.25833 2.5L1.25 8.33333L13.75 10L1.25 11.6667L1.25833 17.5L18.75 10L1.25833 2.5Z" />
                        </svg>
                        <span className='hidden origin:block font-semibold text-sm ml-2' onClick={handleSubmit}>Send</span>
                    </button>
                </form>
            </section>
        </main>
    );
}
Add the style definitions from the git repository to globals.css
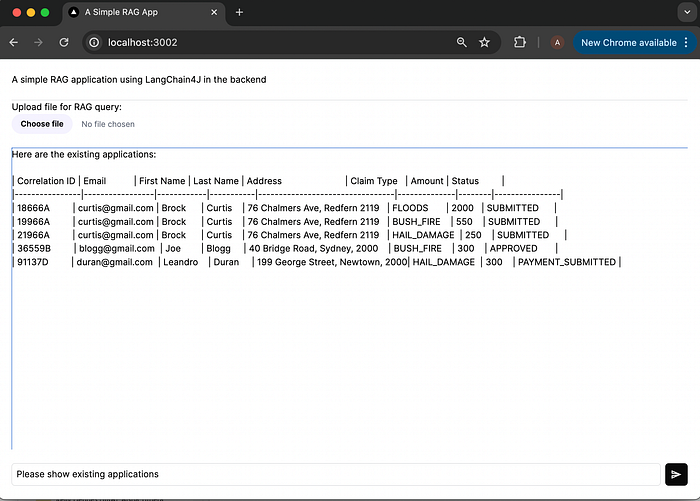
We can now submit queries through the chat interface and display responses from our backend system. For example, we can request to retrieve all claim applications currently present in the system. These applications are stored in memory within the CustomerService object, which may be interfacing with a database to manage records.
    public CustomerService() {
        customers.add(new Customer("18666A", "curtis@gmail.com", "Brock", "Curtis", "76 Chalmers Ave, Redfern 2119", "FLOODS", 1000, "SUBMITTED"));
        customers.add(new Customer("19966A", "curtis@gmail.com", "Brock", "Curtis", "76 Chalmers Ave, Redfern 2119", "BUSH_FIRE", 550, "SUBMITTED"));
        customers.add(new Customer("21966A", "curtis@gmail.com", "Brock", "Curtis", "76 Chalmers Ave, Redfern 2119", "HAIL_DAMAGE", 250, "SUBMITTED"));
        customers.add(new Customer("36559B","blogg@gmail.com", "Joe", "Blogg", "40 Bridge Road, Sydney, 2000", "BUSH_FIRE", 300, "APPROVED"));
        customers.add(new Customer("91137D", "duran@gmail.com","Leandro", "Duran", "199 George Street, Newtown, 2000", "HAIL_DAMAGE", 300, "PAYMENT_SUBMITTED"));

    }
A query should return the response as below:

6. Functionality to Upload Your Own Documents
Now let’s add a file upload endpoint to add personal documents that we would like to query.
First create a document ingestion service that will create and store embeddings for the uploaded documents for retrieval augmentation. The DocIngestionService below uses DocumentLoader from LangChain4J to load the uploaded document and then store into embedding store using the EmbeddingStoreIngester.
import dev.langchain4j.data.document.Document;
import dev.langchain4j.data.document.DocumentParser;
import dev.langchain4j.data.document.parser.TextDocumentParser;
import dev.langchain4j.data.document.parser.apache.pdfbox.ApachePdfBoxDocumentParser;
import dev.langchain4j.store.embedding.EmbeddingStoreIngestor;
import org.springframework.core.io.FileSystemResourceLoader;
import org.springframework.core.io.Resource;
import org.springframework.core.io.ResourceLoader;

import java.io.IOException;
import java.nio.file.Path;

import static dev.langchain4j.data.document.loader.FileSystemDocumentLoader.loadDocument;

public class DocIngestionService {
    private final EmbeddingStoreIngestor embeddingStoreIngestor;
    private final ResourceLoader resourceLoader;
    public DocIngestionService(EmbeddingStoreIngestor embeddingStoreIngestor, FileSystemResourceLoader resourceLoader) {
       this.embeddingStoreIngestor = embeddingStoreIngestor;
       this.resourceLoader = resourceLoader;
    }

    public void storeDocument(String filePath) throws IOException {
        Resource resource = resourceLoader.getResource(filePath);
        Document document = loadDocument(Path.of("/", resource.getFile().toPath().toString()), getParserForDocument(resource));
        embeddingStoreIngestor.ingest(document);
    }

    private DocumentParser getParserForDocument(Resource resource) throws IOException {
        return resource.getFile().toPath().toString().endsWith(".pdf") ? new ApachePdfBoxDocumentParser() : new TextDocumentParser();
    }
}
Now we can create a FileUpload endpoint that will use DocumentIngestionService above to ingest the uploaded documents into the embedding store.
@RestController()
@CrossOrigin(origins = "*")
public class UploadController {

    private final DocIngestionService docIngestionService;

    @Autowired
    public UploadController(DocIngestionService docIngestionService) {
        this.docIngestionService = docIngestionService;
    }

    @PostMapping(value = "/upload")
    public StatusResponse uploadDocument(@RequestPart("file") FilePart file) {
        System.out.println("The uploaded file: " + file);
        file.headers().forEach((h,j) -> System.out.print(STR."""
                \{h} -> \{j}
                """));
        // Get the filename from the request parameter
        String filename = file.filename();

        // Create a new file in the specified directory with the original filename
        String uploadDirectory = "tmp";
        File newFile = new File(uploadDirectory, filename);

       Mono<Void> asyncStoreDoc = Mono.fromRunnable(() -> {
           try {
               docIngestionService.storeDocument(newFile.getAbsolutePath());
           } catch (IOException e) {
               throw new RuntimeException(e);
           }
       });

        file.transferTo(newFile.toPath()).then(asyncStoreDoc).subscribe();

        return new StatusResponse("OK", "Successful");
    }
}
Spring Configuration for the file upload beans will look like below:
package example.app.langchain.langchainapp.config;

import dev.langchain4j.data.document.Document;
import dev.langchain4j.data.document.DocumentParser;
import dev.langchain4j.data.document.DocumentSplitter;
import dev.langchain4j.data.document.parser.TextDocumentParser;
import dev.langchain4j.data.document.parser.apache.pdfbox.ApachePdfBoxDocumentParser;
import dev.langchain4j.data.document.splitter.DocumentSplitters;
import dev.langchain4j.data.segment.TextSegment;
import dev.langchain4j.model.embedding.EmbeddingModel;
import dev.langchain4j.model.openai.OpenAiTokenizer;
import dev.langchain4j.store.embedding.EmbeddingStore;
import dev.langchain4j.store.embedding.EmbeddingStoreIngestor;
import example.app.langchain.langchainapp.service.DocIngestionService;
import org.springframework.context.annotation.Bean;
import org.springframework.context.annotation.Configuration;
import org.springframework.core.io.FileSystemResourceLoader;
import org.springframework.core.io.Resource;

import java.io.IOException;

import static dev.langchain4j.data.document.loader.FileSystemDocumentLoader.loadDocument;
import static dev.langchain4j.model.openai.OpenAiModelName.GPT_3_5_TURBO;

@Configuration
public class DocumentUploadConfig {
    @Bean
    EmbeddingStoreIngestor embeddingStoreIngestor(EmbeddingModel embeddingModel, EmbeddingStore<TextSegment> embeddingStore) {
        DocumentSplitter documentSplitter = DocumentSplitters.recursive(100, 0, new OpenAiTokenizer(GPT_3_5_TURBO));
        return EmbeddingStoreIngestor.builder()
                .documentSplitter(documentSplitter)
                .embeddingModel(embeddingModel)
                .embeddingStore(embeddingStore)
                .build();
    }

    @Bean
    FileSystemResourceLoader resourceLoader() {
        return new FileSystemResourceLoader();
    }

    @Bean
    DocIngestionService docIngestionService(EmbeddingStoreIngestor embeddingStoreIngestor, FileSystemResourceLoader resourceLoader) {
        return new DocIngestionService(embeddingStoreIngestor, resourceLoader);
    }

    private DocumentParser getParserForDocument(Resource resource) throws IOException {
        return resource.getFile().toPath().toString().endsWith(".pdf") ? new ApachePdfBoxDocumentParser() : new TextDocumentParser();
    }

    private void loadEmbeddingForDocument(EmbeddingModel embeddingModel, Resource resource, EmbeddingStore<TextSegment> embeddingStore) throws IOException {
        Document document = loadDocument(resource.getFile().toPath(), getParserForDocument(resource));

        DocumentSplitter documentSplitter = DocumentSplitters.recursive(100, 0, new OpenAiTokenizer(GPT_3_5_TURBO));
        EmbeddingStoreIngestor ingestor = EmbeddingStoreIngestor.builder()
                .documentSplitter(documentSplitter)
                .embeddingModel(embeddingModel)
                .embeddingStore(embeddingStore)
                .build();
        ingestor.ingest(document);
    }
}
Now add the file upload functionality in UI. The snippet to handle upload is shown below but for the complete code refer to src/app/page.tsx in the repository.
...
...
  const [file, setFile] = useState<any>({});
  const [fileUploadMsg, setFileUploadMsg] = useState<string>("");

  const upload = () => {
    const url = 'http://localhost:8080/upload';
    const formData = new FormData();
    formData.append("file", file);

    fetch(url, {
      method: 'POST',
      body: formData
    })
      .then(response => response.json())
      .then(result => {
        setFileUploadMsg("Document uploaded successfully");
      })
      .catch(error => {
        setFileUploadMsg("Error uploading the document");
      });
  };
...
...
7. Verify Application
To start the application backend, navigate to the root folder of the application and run ./mvnw sping-boot:run which will start the application at http://localhost:8080
To start the UI, navigate to the UI application root folder and runnpm run dev which by default will launch the UI at http://localhost:3000
We can now list current applications as shown below:
And run query on a specific application, for e.g., application id 18666A
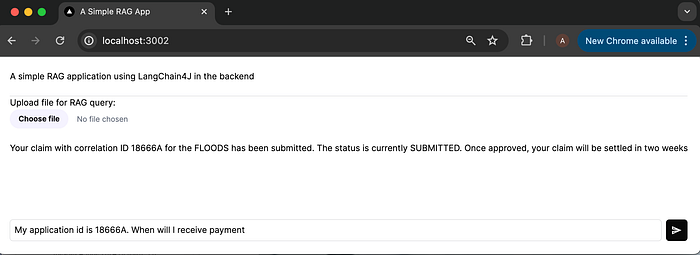
Let’s create more specific rules for processing of the claims and upload into the application. We can copy the following text into a file and upload the file into application.
If the application is in SUBMITTED status, it can only be settled after it has been approved.
It can take a week for the approval. If the application is in PAYMENT_SUBMITTED status,
payment has already been approved and funds are on the way. If the application is in SUBMIITTED status
and the claim amount is more than $1000, it will need special assessment which can take upto three weeks
for approval. Only the applications in APPROVED status will be paid.
Now if we run the same query for appliction id 18666A, it will provide a different response this time by taking into account the new rules that we just uploaded.

8. Conclusion
In this tutorial, we accomplished the following:
1. Created a Custom Agent:
- Utilized Spring Boot and LangChain4J to develop a custom agent.
2. Integrated LangChain Tools:
- Incorporated operations to interact with our internal data using LangChain Tools.
3. Built a Chat Interface:
- Developed a chat interface with React.
- Added functionality to upload custom documents.
4. Verified Functionality:
- Ensured we could query our internal data through the RAG application.
- Demonstrated further customization by uploading our own documents for added context.
Reference: