Build Your Own AI ChatBot for a LangGraph Agent In Minutes Using Shadcn/UI
Chatbot-styled UIs have become the default interface for interacting with AI systems, thanks to their popularity fueled by tools like ChatGPT.
Whenever I create AI-powered APIs, I’m always wishing for a quick-launch solution — a simple, elegant chat interface to test and interact with my latest creation.
Enter Shadcn/UI — the ultimate toolkit for crafting sleek, reusable UIs in record time. Built on the solid foundation of Radix UI components and Tailwind CSS, Shadcn/UI empowers you to focus on functionality while maintaining a polished, professional look.
In this post, we’ll walk through an example of setting up a ChatBot UI for a LangGraph agent, showcasing just how quickly you can get started with Shadcn/UI.
The complete source code for the app is available at
https://github.com/achalise/llm-experiments/tree/main/claim-processor-app
The LangGraph Agent API
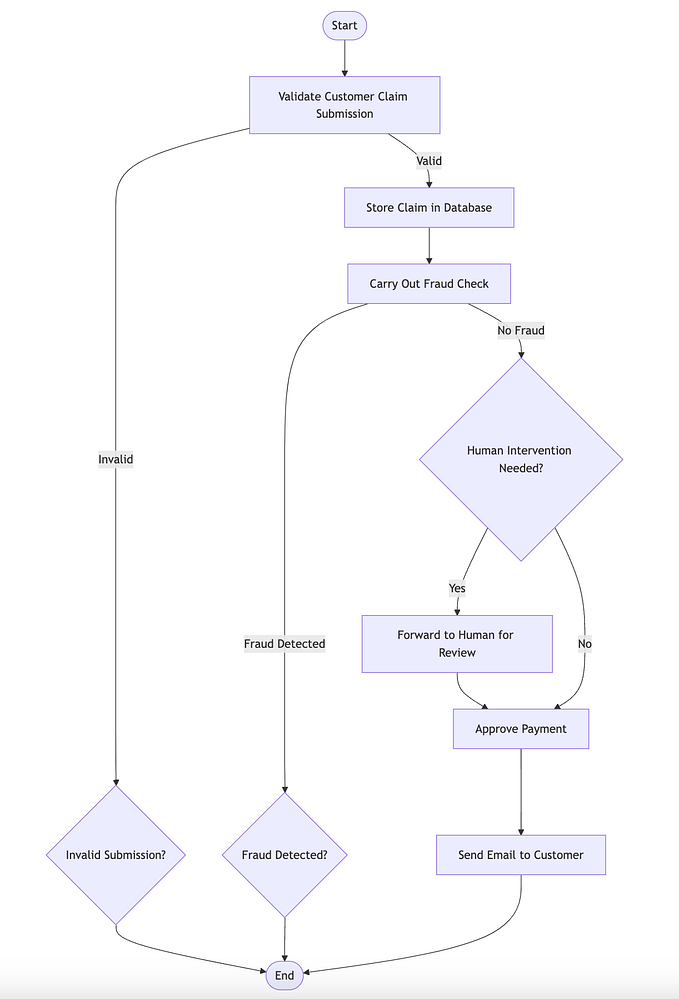
The LangGraph agent we’re using is designed to process insurance claim applications. Detailed setup instructions can be found here. Once you’ve got it running locally, the agent serves requests at this endpoint:
http://localhost:3000/api/chat?message=To interact with the agent, send your message as a query parameter. For example, if you ask:
“What can you do for me?”
You’ll receive a structured response like this which consists of
- HumanMessage: Captures the user’s input.
- AIMessage: Contains the agent’s reply.
- ToolMessage (if applicable): Includes details of any tools the agent invoked during the interaction.
[
    {
        "type": "HumanMessage",
        "content": "What can you do for me"
    },
    {
        "type": "AIMessage",
        "content": "I can assist you in submitting an insurance claim. ..."
    }
]
[
    {
        "lc": 1,
        "type": "constructor",
        "id": [
            "langchain_core",
            "messages",
            "HumanMessage"
        ],
        "kwargs": {
            "content": "What can you do for me",
            "additional_kwargs": {},
            "response_metadata": {},
            "id": "ddd4d2d8-1086-42d0-bbd0-67b2ad960fe3"
        }
    },
    {
        "lc": 1,
        "type": "constructor",
        "id": [
            "langchain_core",
            "messages",
            "AIMessage"
        ],
        "kwargs": {
            "lc_serializable": true,
            "lc_kwargs": {
                "lc_serializable": true,
                "lc_kwargs": {
                    "content": "I can assist you in submitting an insurance claim. To get started, I will need some information from you. Please provide me with the following details:\n\n1. Your email address\n2. Policy number\n3. Claim type\n4. Claim amount\n5. Claim description\n\nOnce you provide this information, I will validate it, check if you exist in our system, create a new claim, perform a fraud check, approve payment if necessary, and send you a confirmation email with the claim details. Let me know if you're ready to proceed and provide the required information.",
                    "tool_calls": [],
                    "invalid_tool_calls": [],
                    "additional_kwargs": {},
                    "response_metadata": {},
                    "id": "chatcmpl-AbFiCFDNy5UQA7V1tv18hz3FpY907"
                },
                "lc_namespace": [
                    "langchain_core",
                    "messages"
                ],
                "content": "I can assist you in submitting an insurance claim. To get started, I will need some information from you. Please provide me with the following details:\n\n1. Your email address\n2. Policy number\n3. Claim type\n4. Claim amount\n5. Claim description\n\nOnce you provide this information, I will validate it, check if you exist in our system, create a new claim, perform a fraud check, approve payment if necessary, and send you a confirmation email with the claim details. Let me know if you're ready to proceed and provide the required information.",
                "additional_kwargs": {},
                "response_metadata": {},
                "id": "chatcmpl-AbFiCFDNy5UQA7V1tv18hz3FpY907",
                "tool_calls": [],
                "invalid_tool_calls": [],
                "usage_metadata": {
                    "output_tokens": 117,
                    "input_tokens": 1098,
                    "total_tokens": 1215,
                    "input_token_details": {
                        "audio": 0,
                        "cache_read": 0
                    },
                    "output_token_details": {
                        "audio": 0,
                        "reasoning": 0
                    }
                }
            },
            "lc_namespace": [
                "langchain_core",
                "messages"
            ],
            "content": "I can assist you in submitting an insurance claim. To get started, I will need some information from you. Please provide me with the following details:\n\n1. Your email address\n2. Policy number\n3. Claim type\n4. Claim amount\n5. Claim description\n\nOnce you provide this information, I will validate it, check if you exist in our system, create a new claim, perform a fraud check, approve payment if necessary, and send you a confirmation email with the claim details. Let me know if you're ready to proceed and provide the required information.",
            "additional_kwargs": {},
            "response_metadata": {
                "tokenUsage": {
                    "promptTokens": 1098,
                    "completionTokens": 117,
                    "totalTokens": 1215
                },
                "finish_reason": "stop"
            },
            "id": "chatcmpl-AbFiCFDNy5UQA7V1tv18hz3FpY907",
            "tool_calls": [],
            "invalid_tool_calls": [],
            "usage_metadata": {
                "output_tokens": 117,
                "input_tokens": 1098,
                "total_tokens": 1215,
                "input_token_details": {
                    "audio": 0,
                    "cache_read": 0
                },
                "output_token_details": {
                    "audio": 0,
                    "reasoning": 0
                }
            }
        }
    }
]
Setting Up the Chatbot UI with Shadcn/UI
Step 1: Initialize a Shadcn/UI Project
Start by creating a new Shadcn/UI project and follow the prompts:
npx shadcn@latest init✔ What is your project named? … my-app
✔ Creating a new Next.js project.
✔ Which style would you like to use? › New York
✔ Which color would you like to use as the base color? › Neutral
✔ Would you like to use CSS variables for theming? … no / yes
✔ Writing components.json.
✔ Checking registry.
✔ Updating tailwind.config.ts
✔ Updating app/globals.css
✔ Installing dependencies.
✔ Created 1 file:
- lib/utils.ts
Success! Project initialization completed.
You may now add components.Step 2: Add Required Components
Shadcn/UI offers a wide range of pre-built components. For our chatbot, we’ll need the following components: Card, Button, Input, and ScrollArea. Add them with:
pnpm dlx shadcn@latest add

? Which components would you like to add? › Space to select. A to toggle all. Enter to submit.
◯ ↑ dialog
◯   drawer
◯   dropdown-menu
◯   form
◯   hover-card
◉   input
◯   input-otp
◯   label
◯   menubar
Step 3: Create a Custom Hook for API Calls
Define a custom hook to interact with the LangGraph agent API:
export function useData() {
    const [data, setData] = useState(null);
    const callApi = async (message: string) => {
        fetch(`http://localhost:3000/api/chat?message=${message}`)
         .then(response => response.json())
         .then(json => {
            setData(json);
        });
    };
    return {data, callApi };
 }
Step 4: Build the Chat Interface
Create a Card component for the chatbot interface. This includes:
- A text input for user queries.
- A scrollable area to display messages.
- A button to submit queries.
Here’s the implementation:
const ClaimProcessorPage = ({ className, ...props}: CardProps) => {
  let {data, callApi} = useData();
  let [query, setQuery] = React.useState<string>("");
  const lastMessage = React.useRef<null | HTMLElement>(null);

  React.useEffect(() => {
    lastMessage.current?.scrollIntoView({ behavior: "smooth" });
  }, [data]);

  const submitQuery = () => {
    callApi(query);
    setQuery("");
  }

  return  (
    <div className="flex min-h-screen bg-slate-100 items-center justify-center">
    <Card className={cn("w-[1000px] h-[800px] grid grid-rows-[min-content_1fr_min-content]  gap-4", className)} {...props}>
      <CardHeader>
        <CardTitle className={"text-2xl font-bold"}> Claim Processor Application</CardTitle>
        <CardDescription>
          Process claims for insurance companies.
        </CardDescription>
      </CardHeader>
      <ScrollArea className="h-full w-full rounded-md border">

      <CardContent className="space-y-3">
        {(data as any)?.map((message: any, index: number) => (
          <div key={message.id} ref={index + 1 === (data as any)?.length ? lastMessage : null}>
            <p><span className="mr-3 font-bold">{message.id[2]}</span><span>{message.kwargs.content}</span></p>
          </div>
        ))}
      </CardContent>
      </ScrollArea>
      <CardFooter>
        <form className="w-full space-x-2 flex justify-end items-center">
          <Input onChange={(e) => setQuery(e.target.value)} value={query}></Input>
          <Button type="button" className="btn btn-primary" onClick={submitQuery}>
          Send
          </Button>
        </form>
      </CardFooter>
    </Card>
    </div>
  );
}

export default ClaimProcessorPage;
Step 5: Run and Test the Application
Run your application:
pnpm run dev
Open the app in your browser, and you’ll see the chatbot interface. Start typing messages in the input field to interact with your LangGraph agent.

Conclusion
Creating a chatbot UI for your AI-powered APIs doesn’t have to be complicated. Shadcn/UI makes it very intuitive and simple, combining pre-built components with beautiful design. In just a few steps, you can build a polished, functional interface to test and showcase your LangGraph agent — or any other AI solution.